
PR
カスタム投稿タイプの一覧を好きな場所に表示したい!【プラグインorPHP】

WordPressでホームページを作っていると、カスタム投稿タイプが必要なケースがでてきます。
 クマ
クマ「カスタム投稿タイプっちゃなんじゃね?」という人はこちらの記事をご覧ください。WordPressでホームページを作る際には結構便利な機能ですよ。
あわせて読みたい


WordPressのカスタム投稿タイプとは?【Custom Post Type UIで簡単設定】
このブログのテーマのひとつに「WordPressでホームページを自作する!」というものがあります。 WordPressでホームページを作るのはかなりオススメと言っているのですが…
このカスタム投稿タイプ、作るのはそこまで難しくないのですし便利なのですが、普通の投稿ではサッとできることができなかったりします。
今回は、
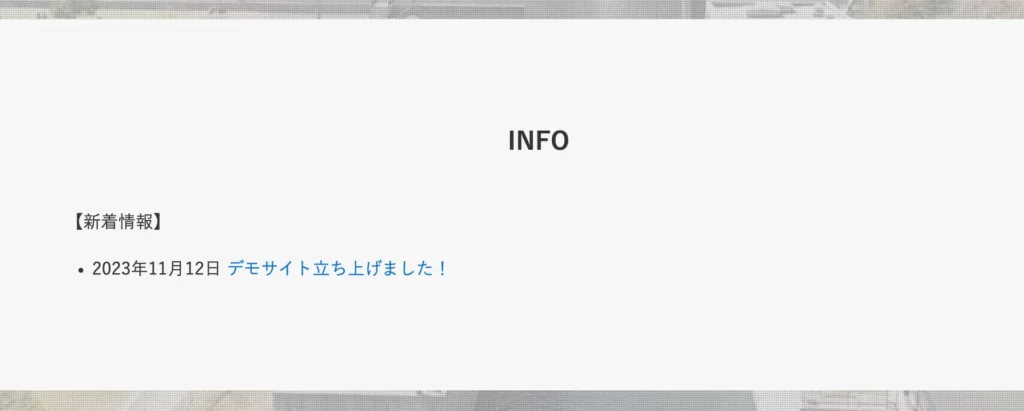
こんな感じでトップページ(や他の好きな場所)にカスタム投稿タイプで作った投稿の一覧を表示させます。
 クマ
クマプラグインを使った方法と外部PHPファイルを作って読み込ませる方法の2パターン紹介します!
※ PHPファイルを読み込ませたり、functions.phpに追記したりするので、間違うとレイアウトが崩れたり、最悪サイトが崩れる可能性もあります。バックアップなど、ちゃんととっておきましょう。
 クマ
クマ(ま、そこまで脅すつもりはないですけどね…)
目次
カスタム投稿タイプの一覧を表示させる「プラグイン編」
正直、一覧を表示させるだけならこっちがオススメです。
カスタム投稿タイプの記事一覧を表示させるプラグイン「Otter Blocks」を使います。記事一覧をアイキャッチ画像付きで表示したり、概要を表示させたり、細かいカスタムも可能です。
クマOtter Blocksは便利な機能をもつオリジナルブロックが沢山入ったプラグインです。ブロックに対してアニメーションをつけたり、カスタムCSSを適用できるので、ブロックのカスタムをするのにすごく便利!英語なのが若干のマイナスポイントです…。
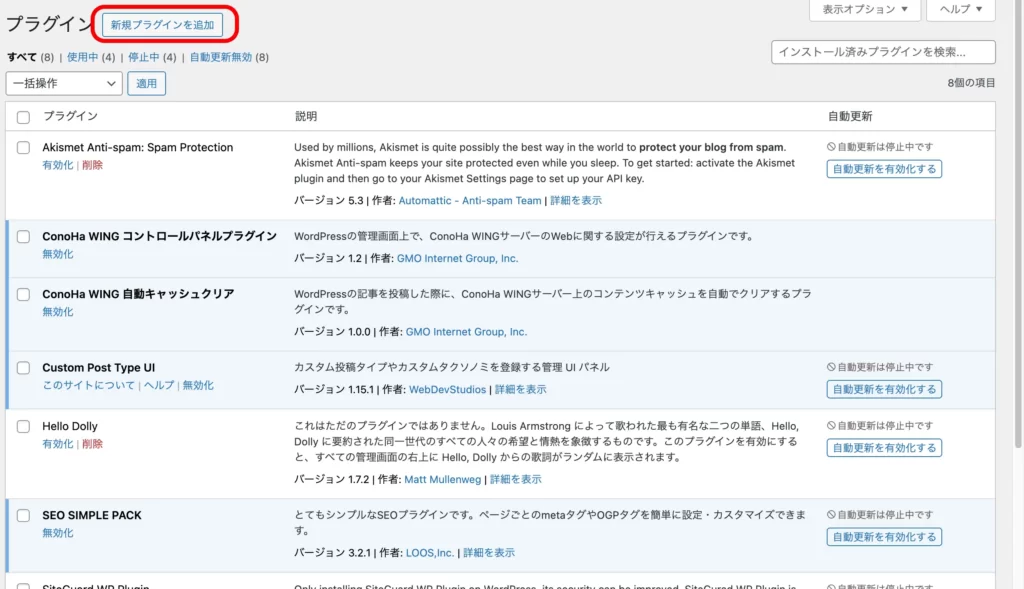
Otter Blocksをインストールする
プラグインのインストールはいつも通り、
- 「新規プラグインを追加」→「Otter Blocks」と検索
- インストール→有効化
でOKです。

カスタム投稿タイプの記事一覧を表示させる
冒頭で説明したように、Otter Blocksをインストールすると、沢山のオリジナルブロックが使えるようになります。
この中の「Posts」を使えば投稿記事の一覧を作ることができます。
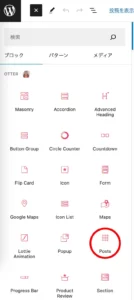
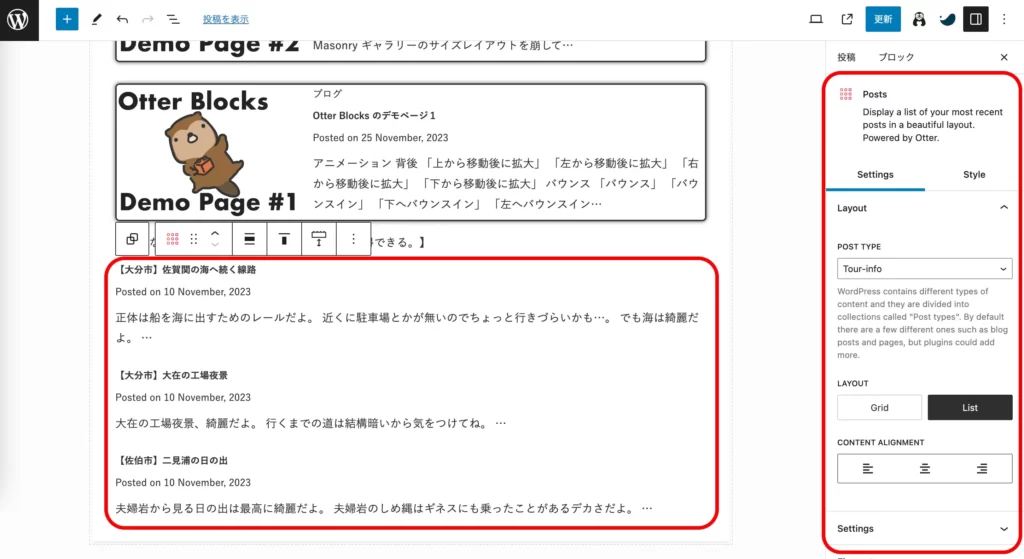
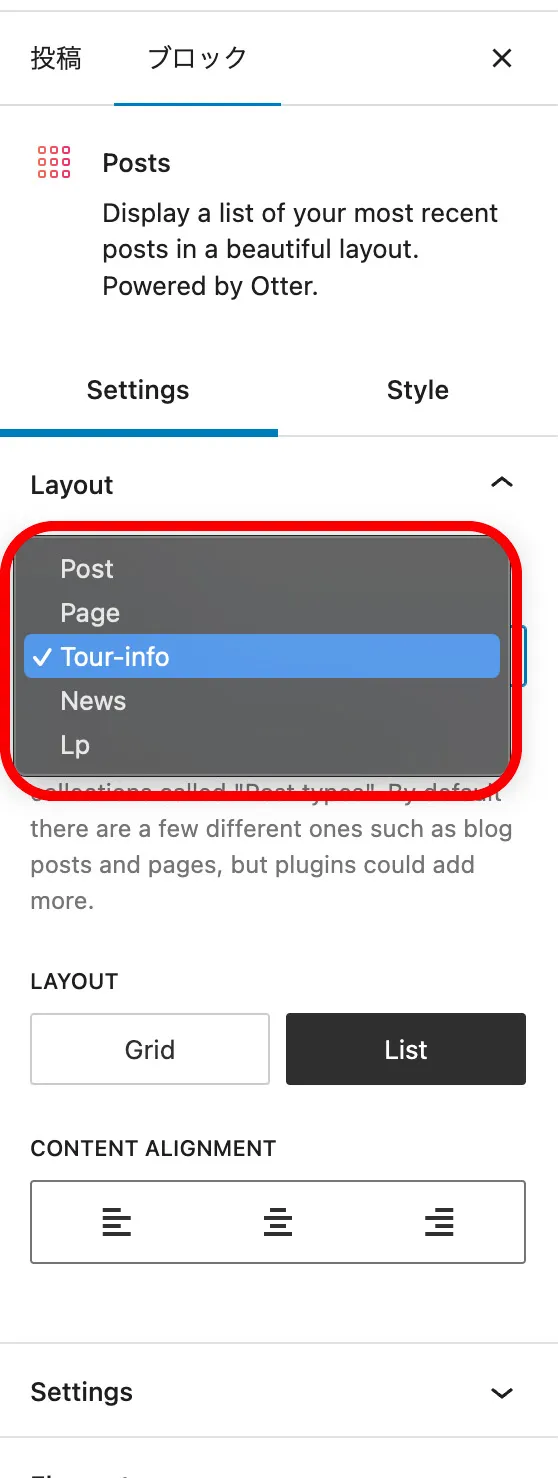
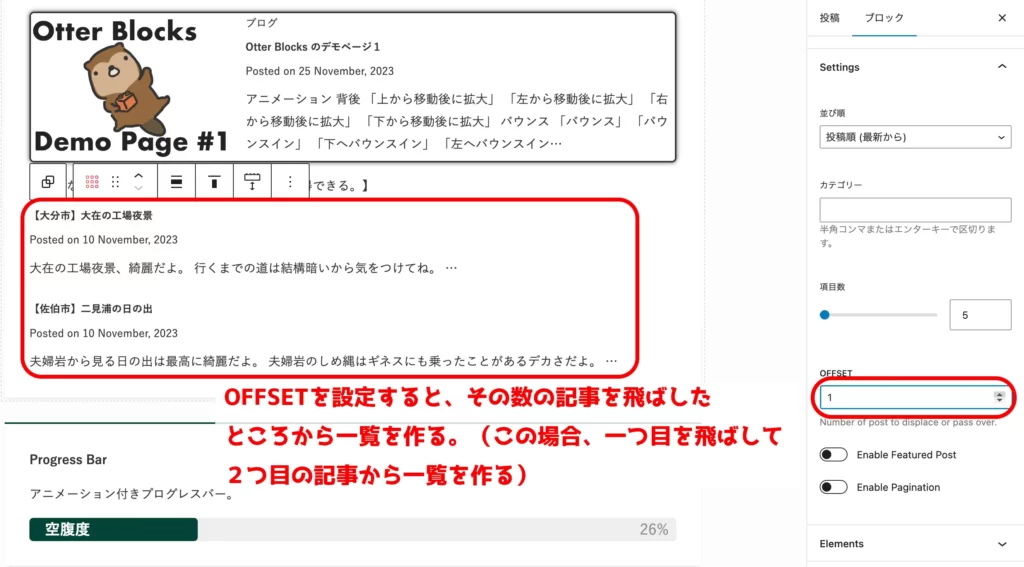
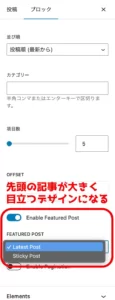
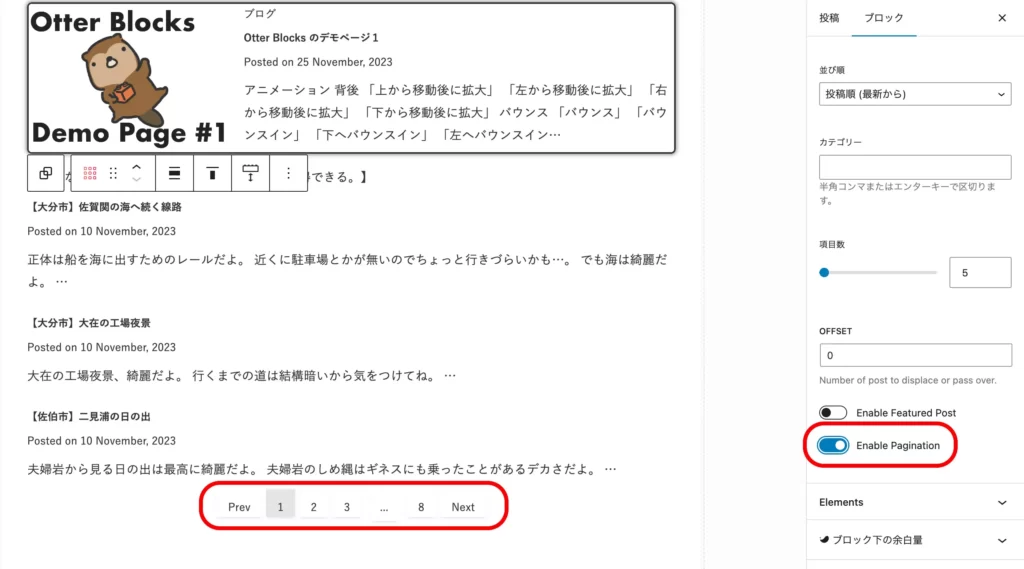
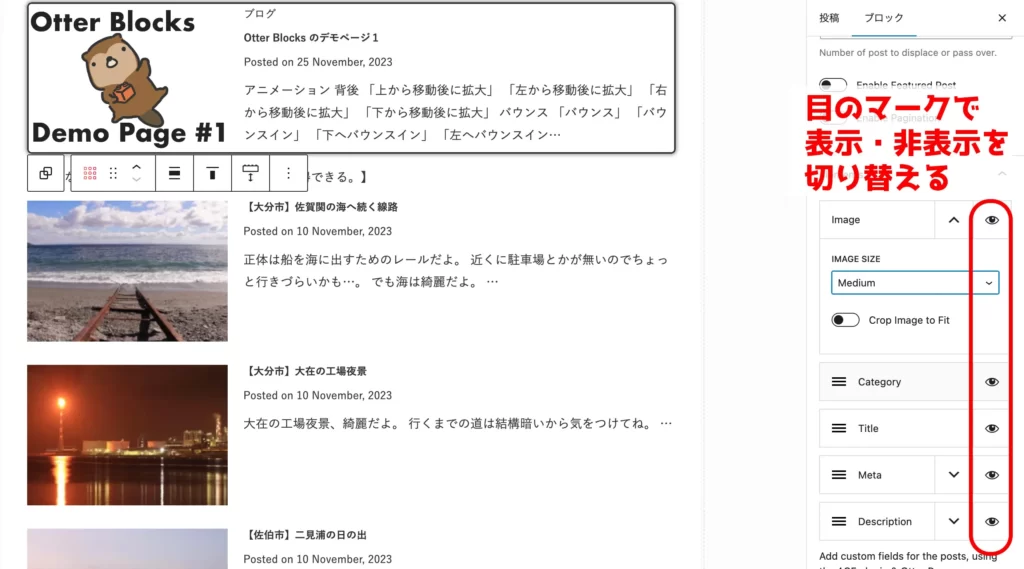
Settings→Layout→POST TYPEで表示したいカスタム投稿タイプのIDを選べばOK!簡単!
 クマ
クマめちゃくちゃ簡単ですね!Otter Blocksは他にも便利なオリジナルブロックやアニメーションをつけたりもできるのでオススメです!
「Posts」の細かい設定については長くなりますので、興味のある人はご覧ください。
「Posts」の細かい設定
順番に画像ベースでどんどん説明していきます。
Settingsタブ
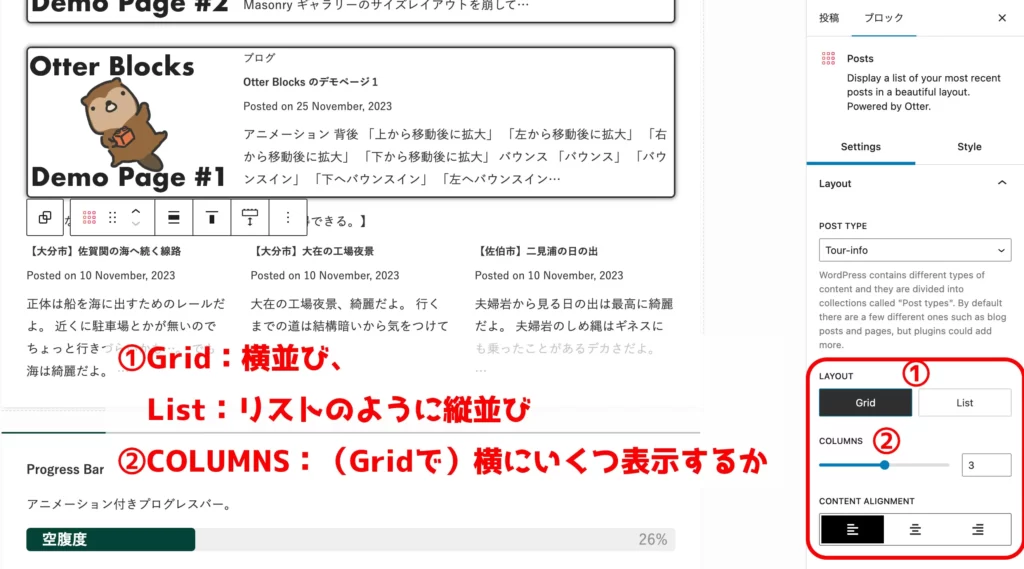
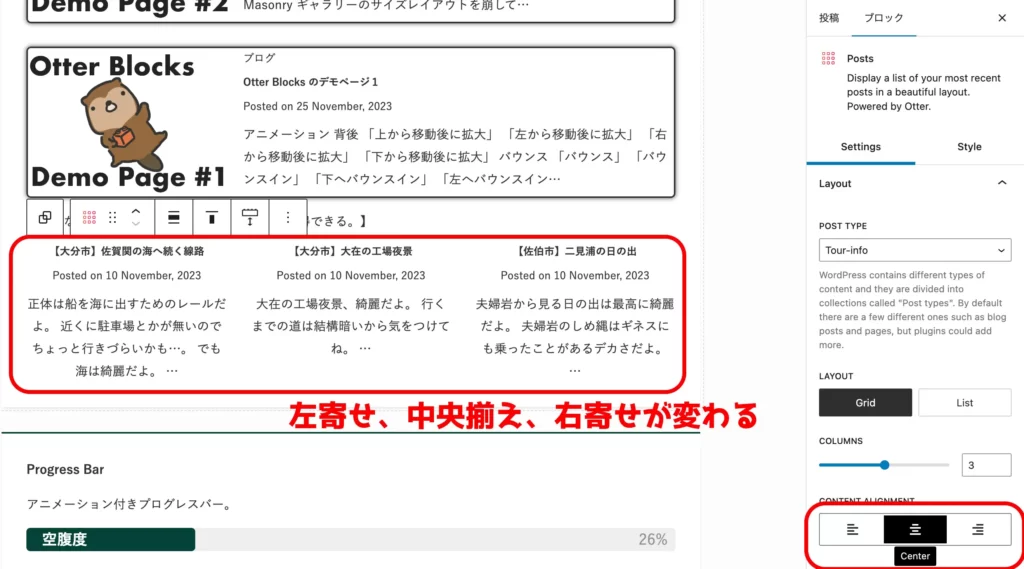
「Layout」
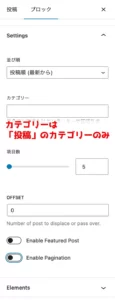
「Settings」
カテゴリーは自分で作ったカスタムタクソノミーを選ぶことができません…残念。
元からある、「投稿」のカテゴリーのみ指定することができます。
その他の設定方法は以下の通り。
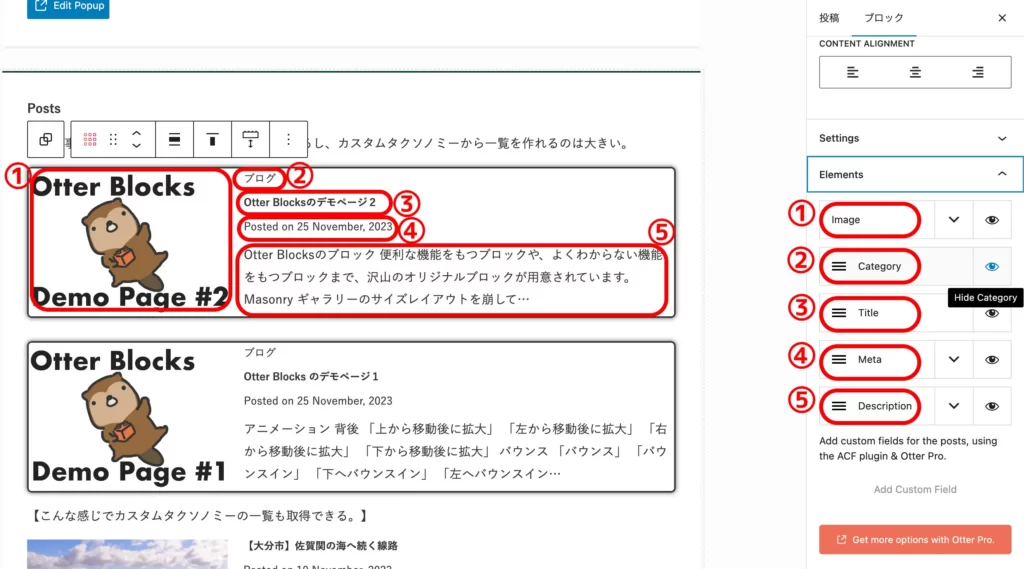
「Elements」
表示する要素を選ぶことができます。
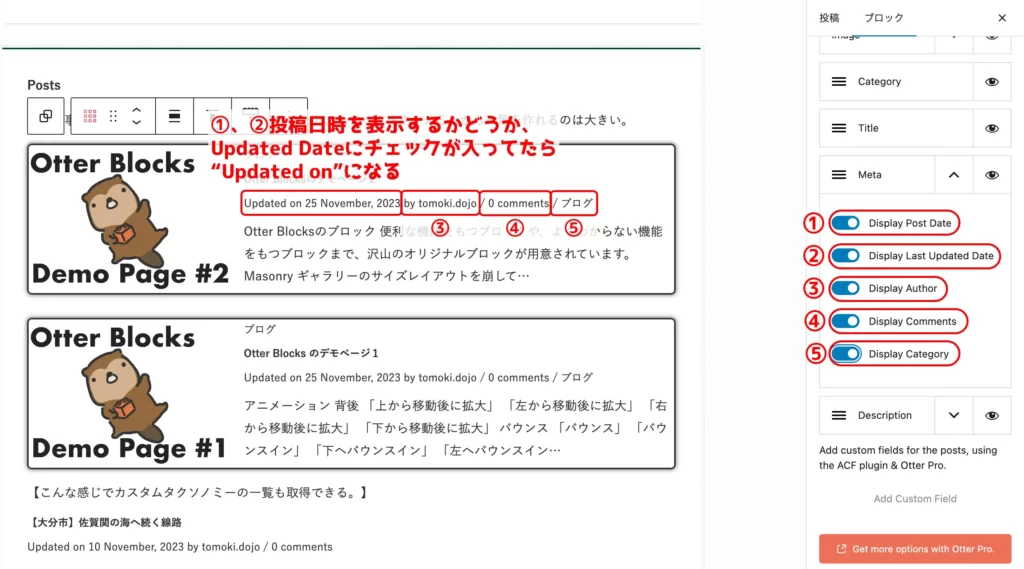
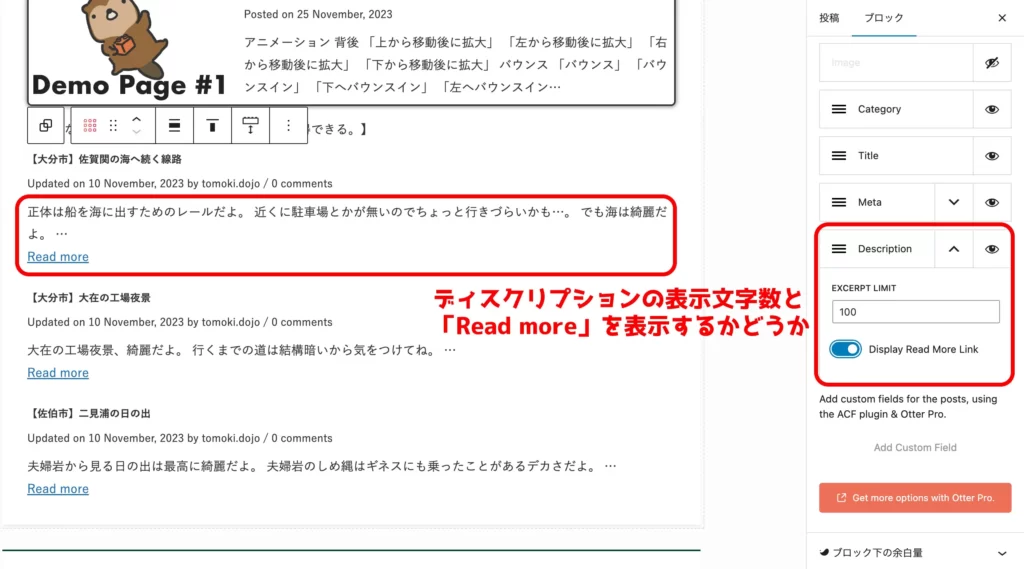
Meta、Discriptionの設定はこんな感じ。
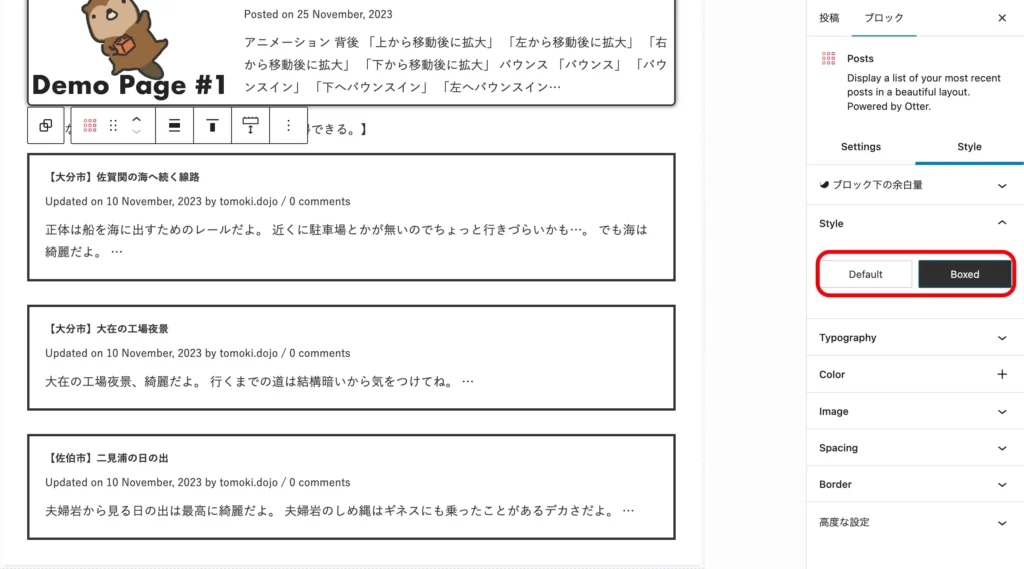
Styleタブ
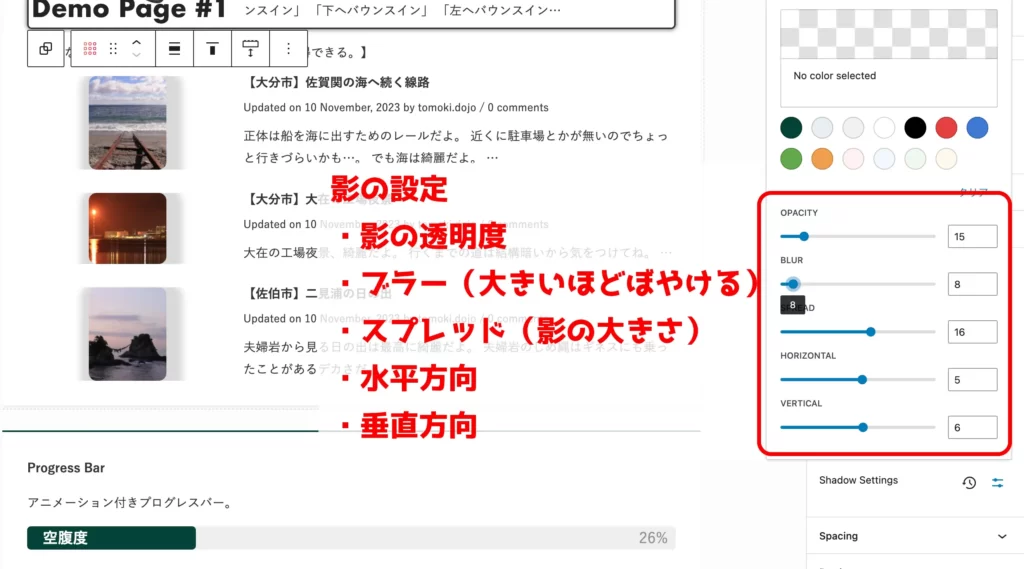
文字の大きさや、枠の有無、影の設定など、外見の設定です。
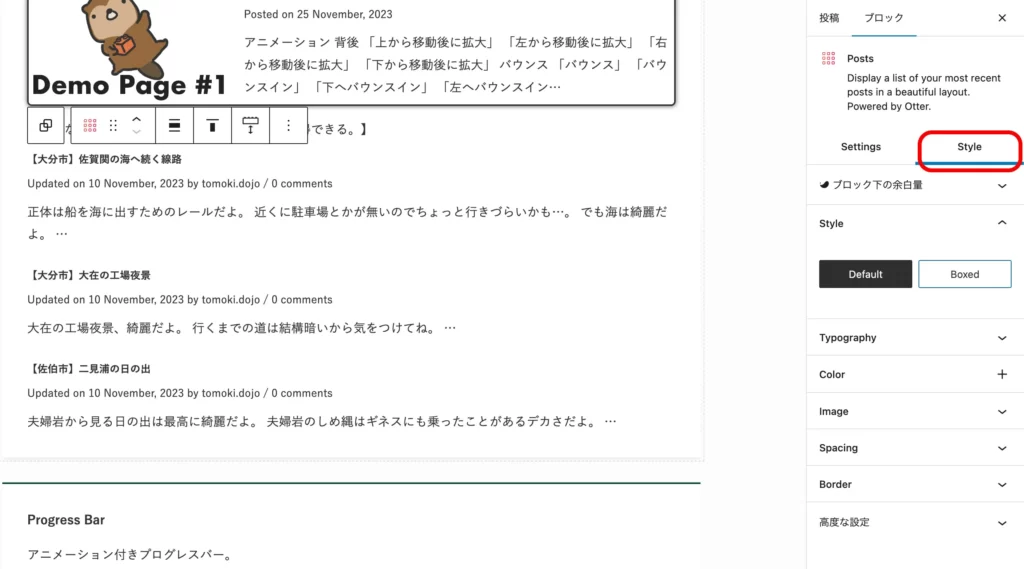
「Style」
枠なしか、枠ありか。
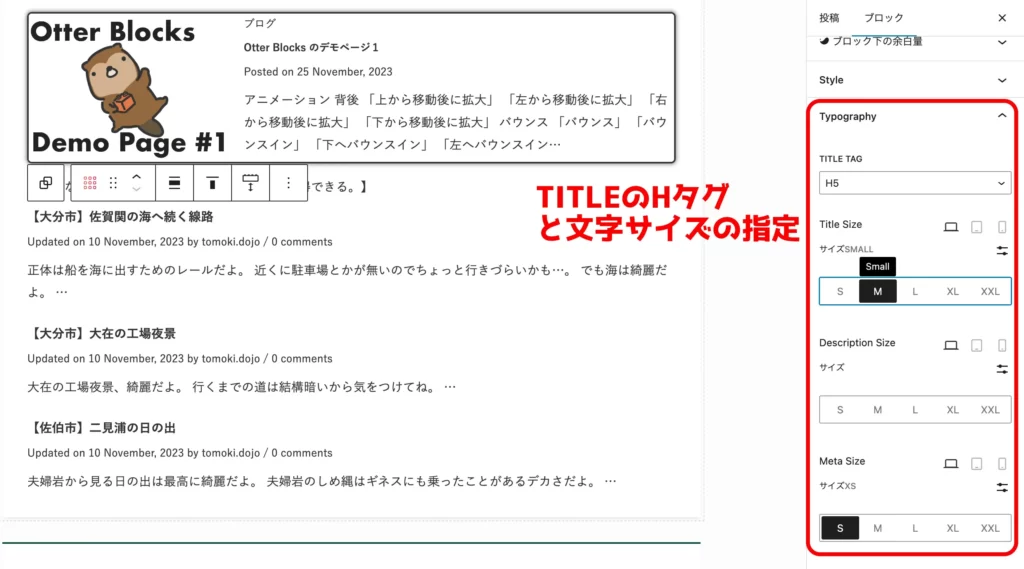
「Typography」
文字サイズの設定。どの文字サイズを変更するか、細かく指定できる。
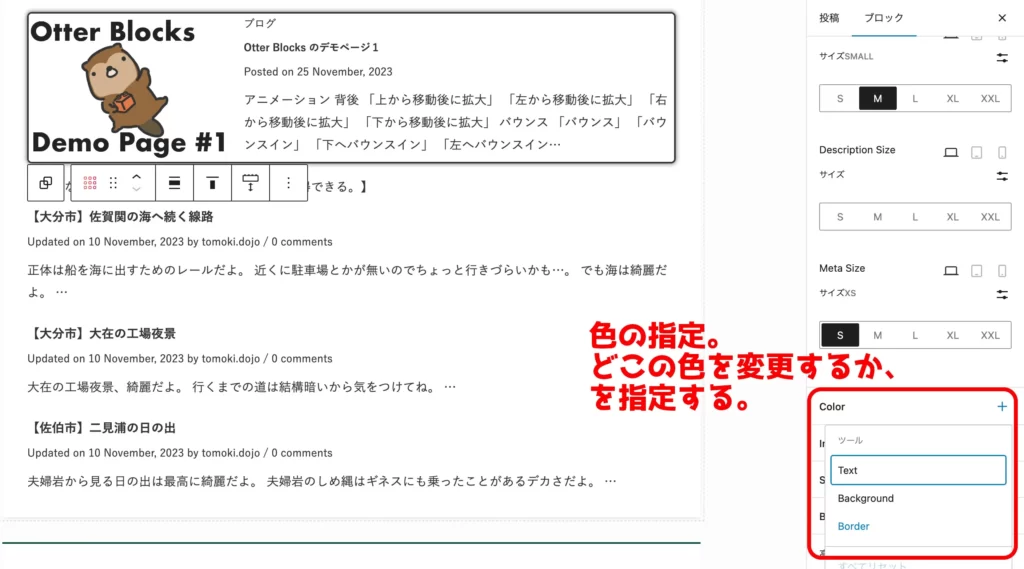
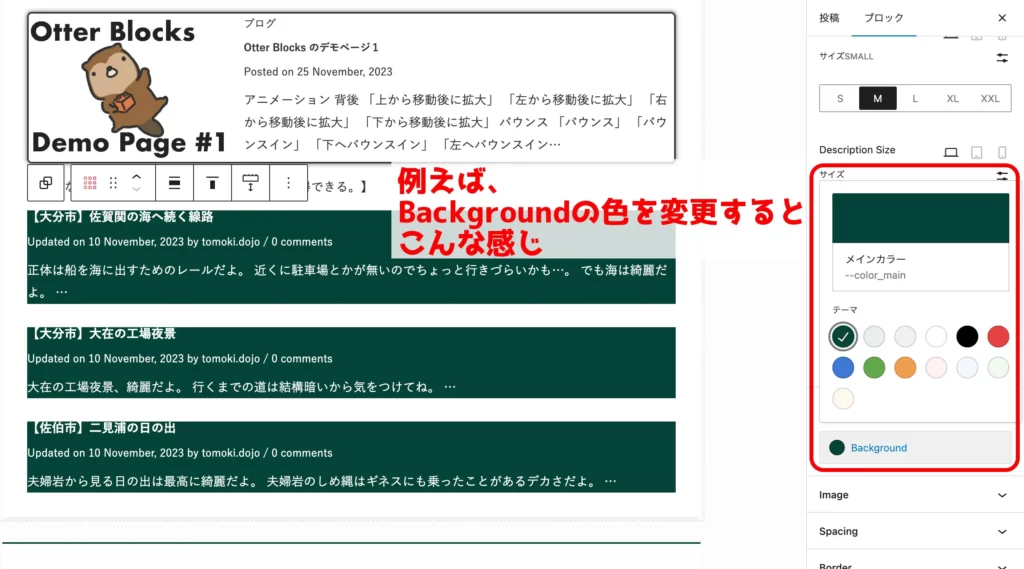
「Color」
各種色の変更。
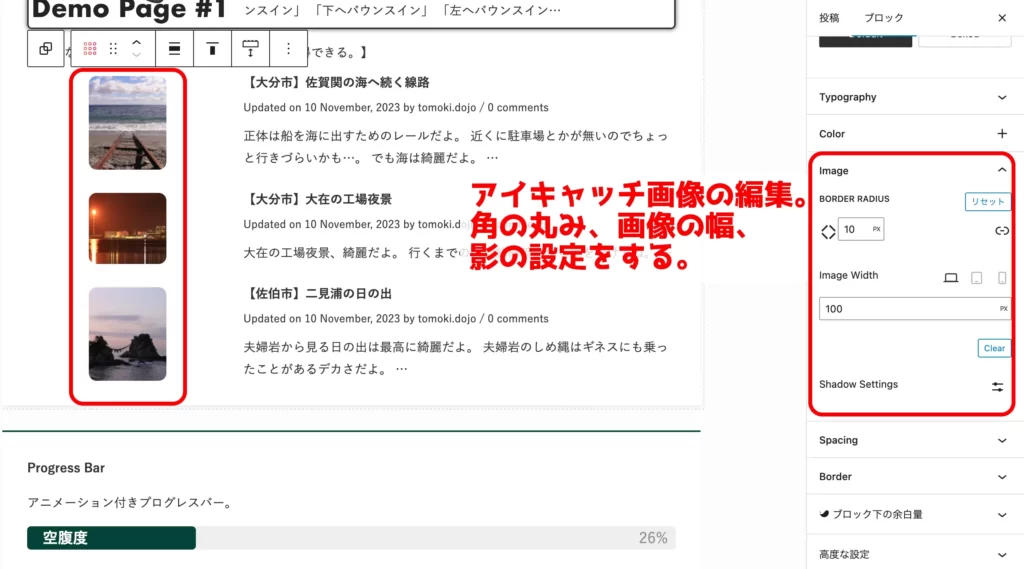
「Image」
アイキャッチ画像の設定。
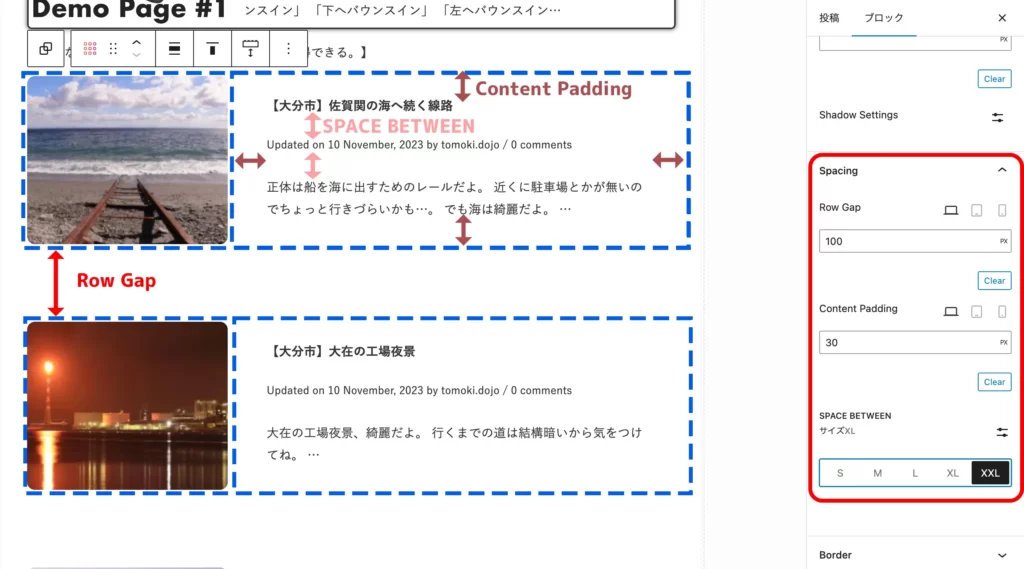
「Spacing」
余白の設定。
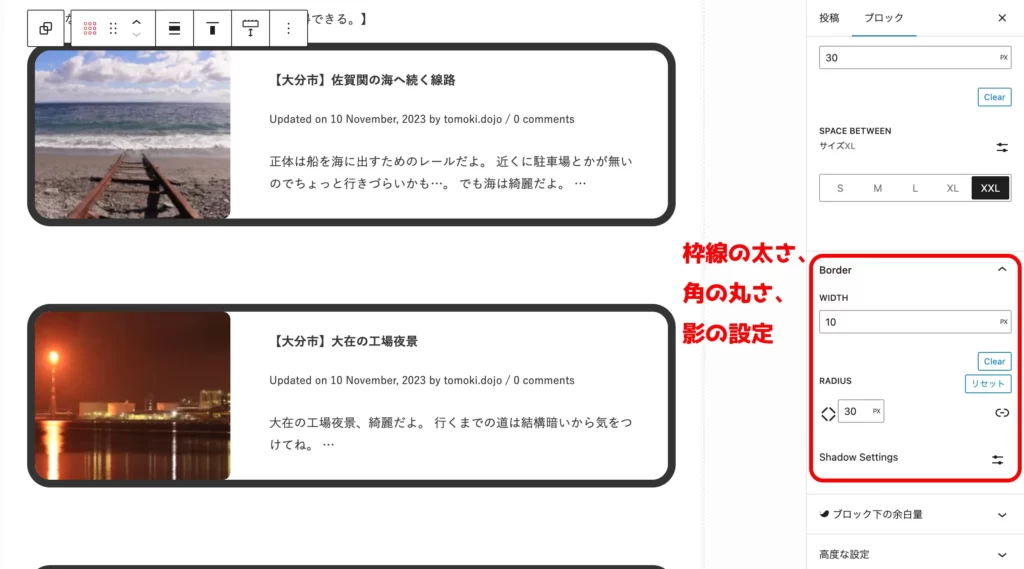
「Border」
枠線の設定。

カスタム投稿タイプの一覧を表示させる「PHP編」
PHPを使った方法は難しく感じますが、この記事の流れに沿ってくれれば誰でもできるようにしていきます!
 クマ
クマ頑張っていきましょう!
ざっと流れを説明すると、ショートコードを使ってカスタム投稿タイプの一覧を表示させます。
そのために、
- カスタム投稿タイプの記事一覧を取得、表示させるためのPHPファイルを作る。
- functions.phpに①のPHPファイルを呼び出すショートコードが使えるように追記する。
- ショートコードを使って好きなところに一覧を呼び出す。
コピペOK!どこをどういじれば何が変わるか?も押さえていきます。
準備するもの
今回のやり方では、
- PHPファイルを作るエディタ。Windowsの「メモ帳」やMacの「テキストエディット」など、なんでもいい。
- PHPファイルをサーバーに送るFTPクライアントソフト。
が必要になるので、事前に使えるようにしておいてください。
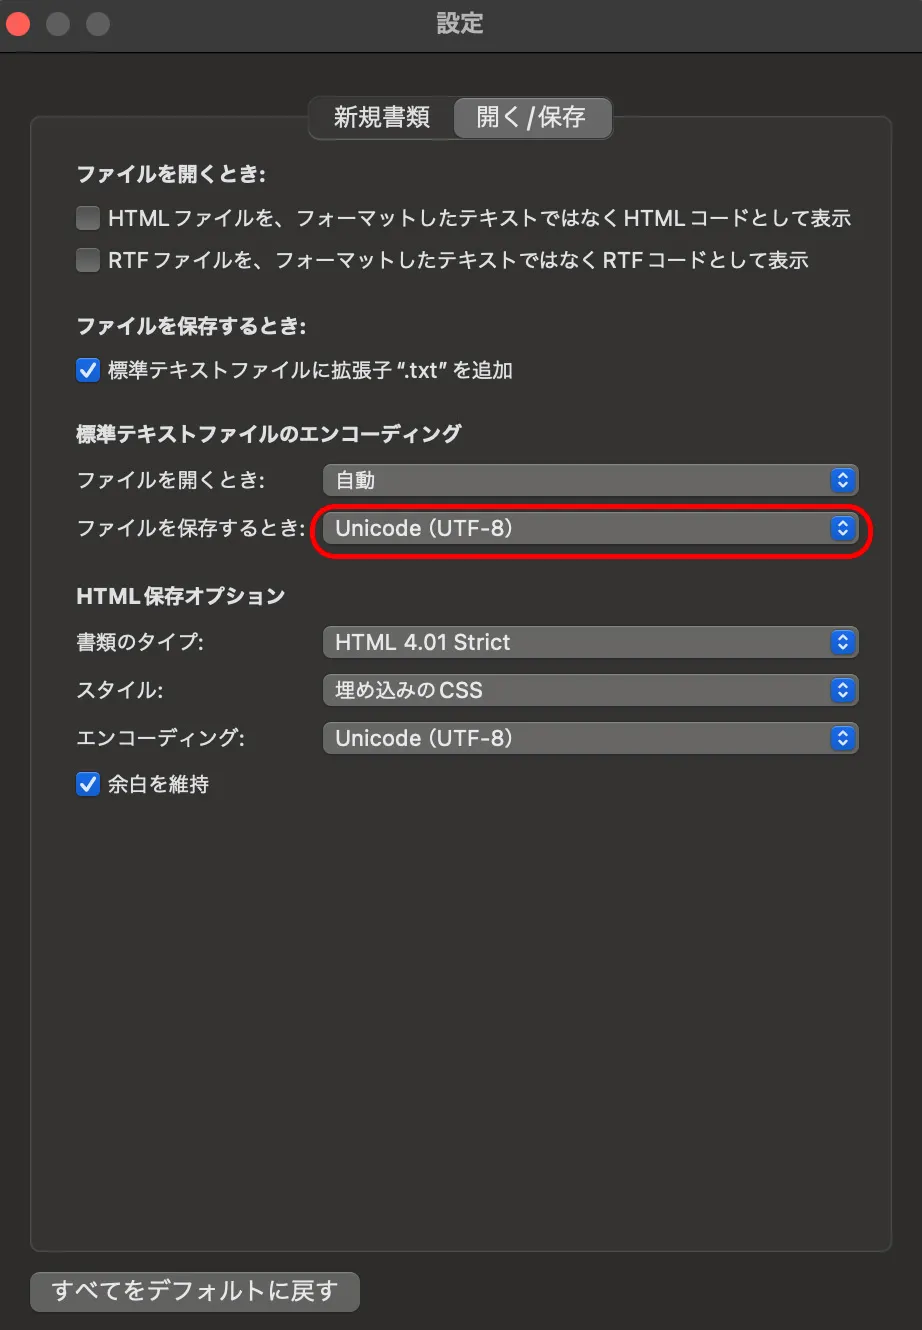
テキストエディタでは、
UTF-8で保存できるようにしておいてください。拡張子は「.php」で保存してください。
Macの「テキストエディット」で作るときにちょっとつまづいたのですが、標準テキストで保存するようにしてください。
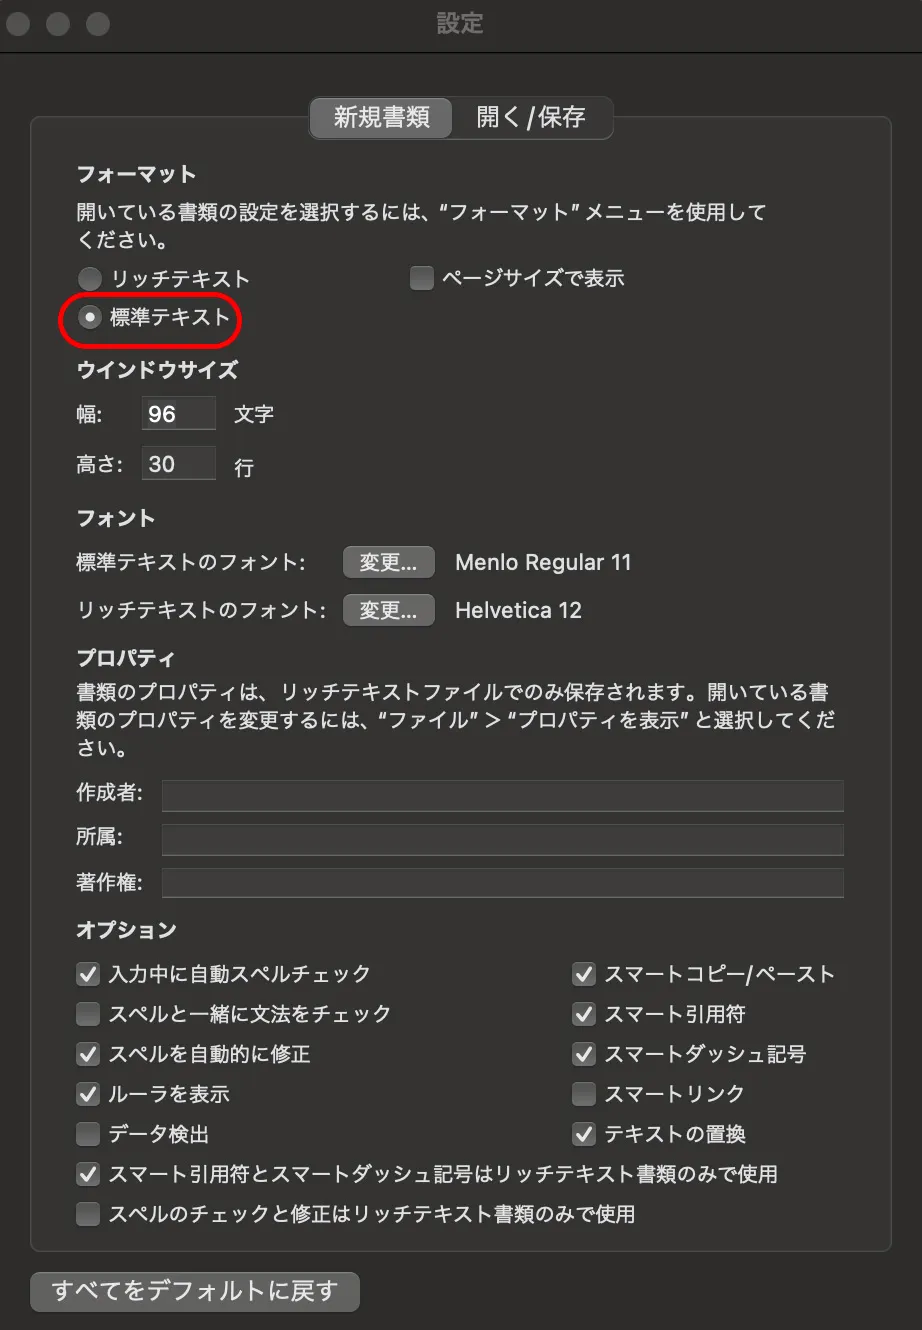
(Mac「テキストエディット」の設定画面です。)
クマヘンな形式でなく、テキスト情報のみのプレーンな保存形式でお願いします…。
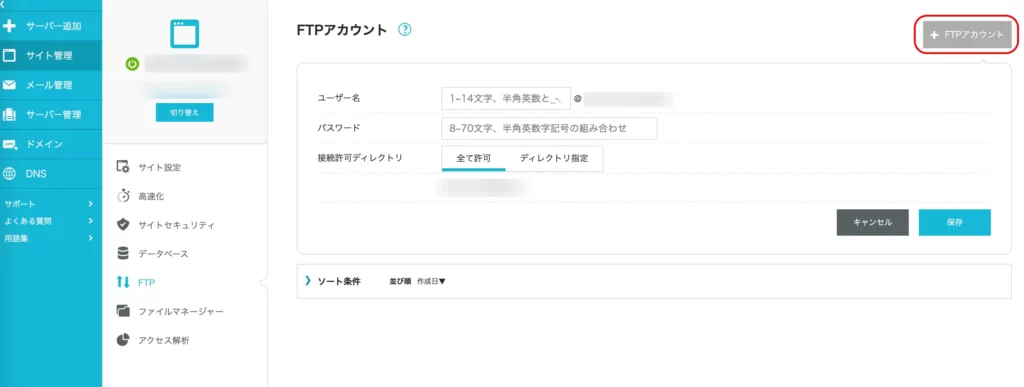
FTPクライアントソフトはWindowsではFFFTP(外部リンクです)、MacではFileZilla(外部リンクです)が有名です。
このブログでも使っているConoHaWINGなら、「サイト管理」→「FTP」から簡単にFTPアカウントが作れます。
それと、既にカスタム投稿タイプが作られていることが前提なので、まだカスタム投稿タイプを作っていない人はこちらの記事を参考にしてカスタム投稿タイプを作っておいてください。
今回のやり方では、カスタム投稿タイプのIDが必要になるのでメモしておいてください。
クマそれでは早速作っていきましょう!
カスタム投稿タイプの一覧を表示させるためのPHPファイルを作る
PHPファイル作成
いきなりですが、ここで作るPHPファイルが埋め込む本体になります。
以下のコードをコピーして、テキストエディタに貼り付けてください。
<?php
  $args = array(
    'post_type' => 'news',
    'posts_per_page' => 5,
    'orderby' => 'date',
    'order' => 'DESC'
  );
  $the_query = new WP_Query($args);
  if ( $the_query->have_posts() ) :
?>
<ul>
  <?php
    while ( $the_query->have_posts() ): $the_query->the_post();
  ?>
  <li>
    <?php the_time('Y年n月j日'); ?> <a href="<?php the_permalink(); ?>"><?php the_title(); ?></a>
  </li>
  <?php
    endwhile;
    wp_reset_postdata();
  ?>
</ul>
<?php
  else :
?>
<p>新着情報はありません。</p>
<?php endif; ?>
貼り付けたら、「newslist.php」などの名前でPHPファイルとして保存してください。大体の場合、拡張子「.php」まで入力して保存すればPHPファイルとして保存される…はずです。
いじってもOKなところ(いじらないといけないところ)
① 3行目のpost_typeはカスタム投稿タイプのIDを指定してください。
'post_type' => 'news',② 4行目のpost_per_pageは何件表示するか?です。お好きにどうぞ。
'posts_per_page' => 5,③ 16行目は表示する一覧の形です。「○年○月○日 (タイトル)」という形ですが、こちらもお好きにどうぞ。
<?php the_time('Y年n月j日'); ?> <a href="<?php the_permalink(); ?>"><?php the_title(); ?></a>④ 26行目は表示する記事がなかったときに表示される文章です。お好きにどうぞ。
<p>新着情報はありません。</p>ファイル名も好きな感じにしてください。最後にショートコードで呼び出すときにこのファイル名で呼び出します。
作ったPHPファイルをサーバーに置く
先ほど作ったPHPファイルをサーバーに置きます。
FTPクライアントソフトを使ってサーバーに接続して、テーマが置いてあるディレクトリにPHPファイルを送ります。
例.ConoHaWINGサーバーで、SWELLを使っていた場合、
public_html(最初ここに繋がる)
├oita-touring.website(ドメイン名)
├wp-content
├themes
├swell
├newslist.php(←swellの下に置く)
ここに置いてください。
functions.phpにショートコードで呼び出せるように追記する
functions.phpに以下のコードを追記します。
function Embed_php($params = array()) {
	extract(shortcode_atts(array('file' => 'default'), $params));
	ob_start();
	include(get_theme_root() . '/' . get_template() . "/$file.php");
	return ob_get_clean();
}
add_shortcode('embed_php', 'Embed_php');
ちなみに、functions.phpは先ほどのサーバーの中のテーマが置いてあるディレクトリのとこにありますが、大体のテーマでは管理画面からも書き込むことができます。
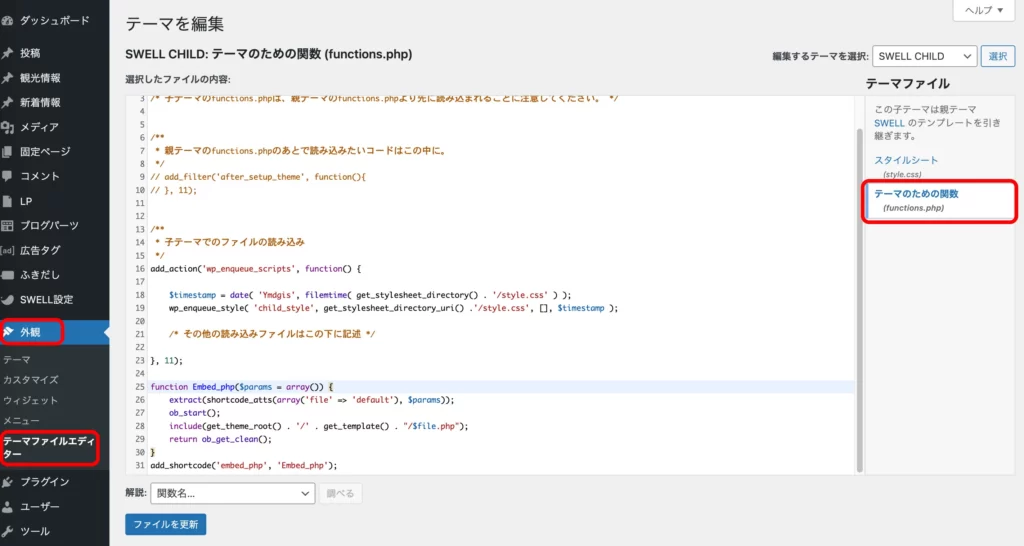 クマ
クマFTPを使う方法でもいいですが、functions.phpファイルをダウンロードして、書き加えて、アップロードする…という手間がかかるので、管理画面から書き込むことをオススメします。
いじってもOKなところ
1行目のEmbed_phpと7行目のEmbed_phpは合わせればOKなので、いじっても構いませんが…ここはどうせ外から見えないので、あまりこだわる必要はないかと思います。
7行目のembed_phpはショートコードの名前になりますので、こちらはお好きなように変えてもOKです。
function Embed_php($params = array()) {add_shortcode('embed_php', 'Embed_php');これで準備は完了です!上手くPHPファイルが作れて(私みたいにヘンな保存方法が原因でつまづいたりせず…涙)、FTPでアップロードできればそこまで手間ではないはず!
好きなところでショートコードを書く!
あとは好きなところにショートコードを書いてください。
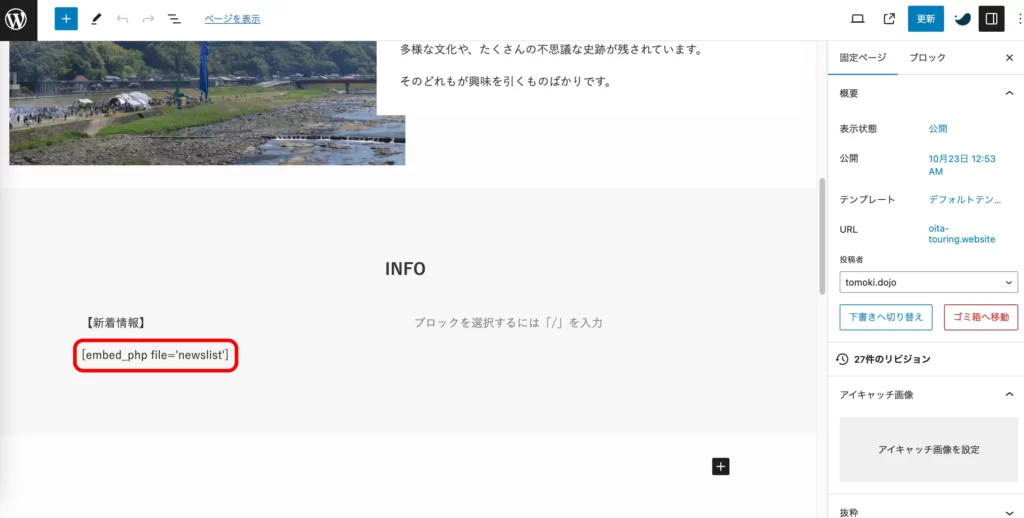
書き方は、
[embed_php file=’newslist’]
こんな感じです。
最初のembed_phpはfunctions.phpで書いたショートコード名を入れてください。
file=’newslist’はPHPのファイル名です。今回は最初に作ったPHPファイルをnewslist.phpとしたので拡張子抜きの’newslist’で指定しています。拡張子は書かなくてOKです。
ちなみにこのやり方を応用すれば、
「パーツとして読ませたいPHPファイルを作る」→「ショートコードで読み込む」
の流れがいくらでも作れるので、ぜひ色々なPHPファイルを読み込ませてみてください!
 クマ
クマCSSを使えばもう少し気の利いたデザインの一覧が作れますよ。
まとめ
カスタム投稿タイプの一覧をトップページやサイドバーなどに埋め込む方法の説明でした。
カスタム投稿タイプは便利なのですが、地味に「これ、いつもの投稿ならできるのにな…」というのができなかったりします。
今回は、プラグインを使った方法とPHPファイルを作ってfunctions.phpファイルに追記する、という2つの方法を説明しました。
「とりあえずアニメーションできればいいや」という人はプラグイン、CSSなどで色々とカスタムしたい人はちょっとレベルの高いPHPを使う方法を検討してみてください。
クマ原理もある程度は説明しているので、自分なりに色々試してみてください!
あわせて読みたい

ConoHaWINGをオススメする理由【実際に使ってみたメリット・デメリット】
こちらの記事で説明しましたが、ブログを運営して収益化まで考えるなら、サーバーの契約とWordPressの設定は必須です。 特に私自身も契約していて、このブログでは実際…
ちょっと一息…
WordPressのテーマは何をお使いでしょうか?
クマこのブログでは有料テーマSWELLを使っています!
私も以前は無料テーマを渡り歩いていました…。
ですが、「あの機能が欲しいな…」とか思う度に色々調べてプラグインを入れたりCSSを触ったり…正直、
クマブログって面倒だな…。なかなか収益にもつながらないし…。
と無料テーマを使っている時期は思っていました。
ですが、あるとき「もしかして有料テーマにしたら楽になるんじゃないか…?今まで苦労して実装してた機能がほとんどテーマ内にあるじゃないか…」と気づき、思い切って有料テーマにしました。
決して安いものではないのでちょっとためらいましたが、思い切って導入して正解でした。
そこからブログ運営の効率がグン!と上がりました。特に、導入時には気にしていなかった広告管理の効率化のメリットが大きく、収益も上がりました。
クマブログ…始めてみたけど、大変だし、成果も上がらない…。
と感じている人は、有料テーマの導入を検討してみてはいかがでしょうか?「ここまで作ってきた」「これから作る」ブログの質・量が断然変わりますし、無料のテーマより断然収益を狙ったブログにしやすくなります。
「有料テーマって他にどんなのがあるの?」という人はぜひこちらの記事もご覧ください。
あわせて読みたい

WordPress無料テーマと有料テーマの違い【オススメのテーマも紹介!】
WordPressでブログやホームページを作る際に、まず悩むのがテーマ選びではないでしょうか? 無料テーマも有料テーマも山ほどあるし、何を選んだらいいかわかんない…。 …

